
You are using an out of date browser. It may not display this or other websites correctly.
You should upgrade or use an alternative browser.
You should upgrade or use an alternative browser.
Full frame off resto
- Thread starter Terryphoon
- Start date
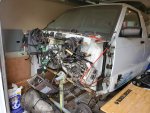
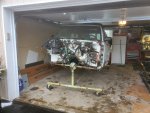
Been burning too much of the midnight oil lately. All nighter here, up at the crack of dawn there. Just too sore and tired for any substantial work on the truck this weekend.
We managed to move everything around in the shop for a bit better access and orgaination.
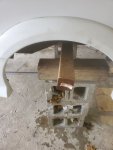
I finnished sand blasting all the metal components of the body mounts. They are now ready for paint. After soaking all the body and frame bolts in evaporust, most came out decent. I will have to get a few new ones and I found exact replacements from McMillan. The rest I may coat with black oxide concentrate but this will require sandblasting or wire wheeling each and ever one. Not sure i want to do that yet.
We managed to move everything around in the shop for a bit better access and orgaination.
I finnished sand blasting all the metal components of the body mounts. They are now ready for paint. After soaking all the body and frame bolts in evaporust, most came out decent. I will have to get a few new ones and I found exact replacements from McMillan. The rest I may coat with black oxide concentrate but this will require sandblasting or wire wheeling each and ever one. Not sure i want to do that yet.
Attachments


So its been a few crazy weeks for me. A busy oncall and just so much work to get completed before the cold hits. Not much time to work on the truck.
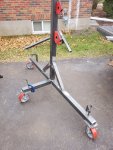
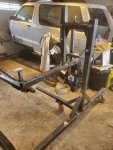
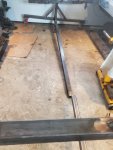
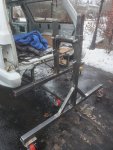
Since I'm still trying to source required parts, I've decided to start on making my own rotisserie. To replace the one its mounted to now.
Odered up the metal and picked a few days later. Dad found a great set of plans online with material list, cut sheet and assembly pictures. This will make quick progress
This morning took my welding cart, chop saw and a bunch of other required tools with me and off to Dads place to finnaly get some progress done.
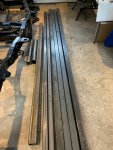
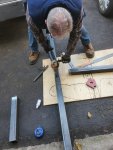
Set the chop saw up in the back yard and we began to cut the metal to the correct dimensions as required. (2.5 x 2.5 x .180 wall sq tube)
I had to wire the welder into the breaker panel for the 230/60/1PH. It really requires a 30Amp 2 pole but since I was welding using a 3/32 rod, the output current wouldn't be too high so the 20Amp breaker we had worked ok.
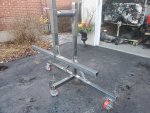
Cleaned the metal up good and tacked together with my Lincoln 180 mig. Once everything squared and Rechecked, I layed out some real nice beads with the miller stick (150STL) I wish I had snaped a few pictures. In the following shots, you can see the metal tube i picked up along with us starting on the uprights to the rotisserie.
T
Since I'm still trying to source required parts, I've decided to start on making my own rotisserie. To replace the one its mounted to now.
Odered up the metal and picked a few days later. Dad found a great set of plans online with material list, cut sheet and assembly pictures. This will make quick progress
This morning took my welding cart, chop saw and a bunch of other required tools with me and off to Dads place to finnaly get some progress done.
Set the chop saw up in the back yard and we began to cut the metal to the correct dimensions as required. (2.5 x 2.5 x .180 wall sq tube)
I had to wire the welder into the breaker panel for the 230/60/1PH. It really requires a 30Amp 2 pole but since I was welding using a 3/32 rod, the output current wouldn't be too high so the 20Amp breaker we had worked ok.
Cleaned the metal up good and tacked together with my Lincoln 180 mig. Once everything squared and Rechecked, I layed out some real nice beads with the miller stick (150STL) I wish I had snaped a few pictures. In the following shots, you can see the metal tube i picked up along with us starting on the uprights to the rotisserie.
T
Attachments


Hey guys,
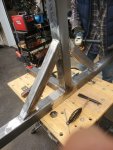
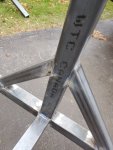
I didn't post last weekend as progress was slow. My old 14" chop saw cut very poorly with the new blade I had on.amd.wasted alot of time. In the end, 4 - 2x2x17" peices were cut and welded in. (Gusetts on the main uprights)
The neighbor loaned Dad a real metal cutting saw and during the week, he cut 90% of the metal into the correct parts. What a time saver that was for this weekend.
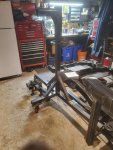
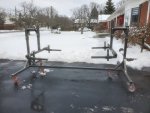
Once I finally got over, we set everything up and went to it. After a couple hours and a pot of coffee, we ended up with whats in the pictures below. All of the welds have good deep roots and everything been run over twice. (I know, they don't look pretty but they strong) Dont think this suckers coming apart.
I can't wait to get the body off that shitty one and onto this thing. Once that happens, I will feel safe working on the body and address the floor and over rust issues.
I didn't post last weekend as progress was slow. My old 14" chop saw cut very poorly with the new blade I had on.amd.wasted alot of time. In the end, 4 - 2x2x17" peices were cut and welded in. (Gusetts on the main uprights)
The neighbor loaned Dad a real metal cutting saw and during the week, he cut 90% of the metal into the correct parts. What a time saver that was for this weekend.
Once I finally got over, we set everything up and went to it. After a couple hours and a pot of coffee, we ended up with whats in the pictures below. All of the welds have good deep roots and everything been run over twice. (I know, they don't look pretty but they strong) Dont think this suckers coming apart.
I can't wait to get the body off that shitty one and onto this thing. Once that happens, I will feel safe working on the body and address the floor and over rust issues.
Attachments


Goodgollyjosh
Active member
Can't wait to see the body on there Terry. Looking good!
Finally got the rotisserie done. So much welding. Due to the cold.and rainy weather, by the time I got to this point, I had enough and just cleaned up.
Probably head over tomorrow and work at mounting the body onto the unit. Most of the parts I have ordered have shown up! Still waiting for the cab floor supports. (Weld to bottom of the new floor pans and sit on the body mounts)
I have decided to reassemble using the original brakes (new pads and rotors ofcouse) and rear end as apposed to upgrading to a later model s10 brake system. Just can't find the parts or a parts truck anywhere. The ones I have found are way too much money and none of the wreckers have. I'm sure one will present itself in the future but for now, its going back original.
Wish I had taken more pictures but I had everything packed up for the day. I will take a bunch putting the body on for everyone to see.
Till then.
Attachments


Ok,
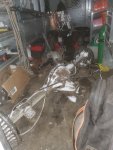
I know I said next time I go out to work on the truck I would be putting her on the new rotisserie but it didn't happen. I also said both the front and back half of the assemblies were complete, but they weren't quite.
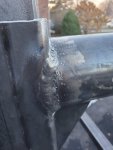
The major components were all welded but I still had to add all the pinch bolts to lock the adjustable components together.
One side is now 100% complete. In the pictures, its the one with the large 3/4 nuts and pinch bolts welded on (10 total)
Its been a long time since I did any real welding. When I was outa high-school and before trade school, I worked at a machine shop and there i learned to weld fairly well. Mig/tig/arc Obviously its been a long time (25+ yrs) but after a 5 or 6 lbs of 7018 & 6011 rods, it comes back. The beads may not be pretty but they're deep and soild.
Of course, ran out of the 3/4 nuts and bolts, these will be a pain in the ass to get due to the lockdowns and curbside shopping pickup. Once those are welded on, the unit is 100% done and ready for the truck body.
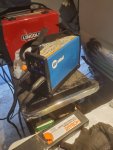
FYI, if you don't already have, and you find one for sale, grab this little blue welder. Small and light but made with the best stuff in the good old USA. (Miller Maxstar 150 STL) thing starts 6010 rod no problem, 120/230V single phase, 100% duty cycle at 100Amps (30% at 150Amp and 60% at 120 amp) The Lincoln in the back works ok but I think I'm going to give to my old man and order myself a brand new Miller multimatic 220 ac/dc.
I know I said next time I go out to work on the truck I would be putting her on the new rotisserie but it didn't happen. I also said both the front and back half of the assemblies were complete, but they weren't quite.
The major components were all welded but I still had to add all the pinch bolts to lock the adjustable components together.
One side is now 100% complete. In the pictures, its the one with the large 3/4 nuts and pinch bolts welded on (10 total)
Its been a long time since I did any real welding. When I was outa high-school and before trade school, I worked at a machine shop and there i learned to weld fairly well. Mig/tig/arc Obviously its been a long time (25+ yrs) but after a 5 or 6 lbs of 7018 & 6011 rods, it comes back. The beads may not be pretty but they're deep and soild.
Of course, ran out of the 3/4 nuts and bolts, these will be a pain in the ass to get due to the lockdowns and curbside shopping pickup. Once those are welded on, the unit is 100% done and ready for the truck body.
FYI, if you don't already have, and you find one for sale, grab this little blue welder. Small and light but made with the best stuff in the good old USA. (Miller Maxstar 150 STL) thing starts 6010 rod no problem, 120/230V single phase, 100% duty cycle at 100Amps (30% at 150Amp and 60% at 120 amp) The Lincoln in the back works ok but I think I'm going to give to my old man and order myself a brand new Miller multimatic 220 ac/dc.
Attachments


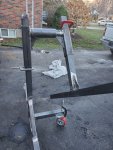
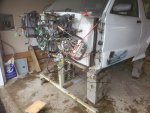
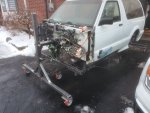
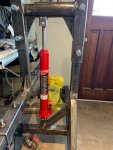
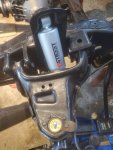
Success! What,a stressful and nerve racking day. Finnaly got my truck off that rickety old thing and onto my heavy duty unit.
Drove over to the dads this morning and first thing was a hot cup of coffee before heading out.
I had to weld the pinch bolts onto the second upright section for the main hight adjustment column. We also last minute fab'd up the lower cross beam that links the front and back uprights together. I had just enough square tubing for this.
Once fully complete, we started cleaning up the garage to make room for the swap. Moved the motor, trans, welding cart, etc out of the way.
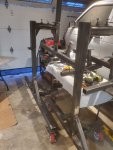
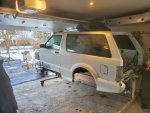
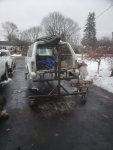
We eye balled approx where all the arms would be located on the new rotisserie and hand tightened the pinchers. Jacked up the truck and set onto the cinder blocks to steady while the yellow p.o.s. was removed. The new one slipped right into place and bolted up no problem. After removing all the support blocks, the truck was sat back down and leveled off. Its rock solid now. As you.can see in the pictures, the truck moves quite easily in and out. I didn't try rolling over yet but feels smooth and I think close to the center of grav so should turn over and back no problem.
Now there is space to start the chassis assembly.
Drove over to the dads this morning and first thing was a hot cup of coffee before heading out.
I had to weld the pinch bolts onto the second upright section for the main hight adjustment column. We also last minute fab'd up the lower cross beam that links the front and back uprights together. I had just enough square tubing for this.
Once fully complete, we started cleaning up the garage to make room for the swap. Moved the motor, trans, welding cart, etc out of the way.
We eye balled approx where all the arms would be located on the new rotisserie and hand tightened the pinchers. Jacked up the truck and set onto the cinder blocks to steady while the yellow p.o.s. was removed. The new one slipped right into place and bolted up no problem. After removing all the support blocks, the truck was sat back down and leveled off. Its rock solid now. As you.can see in the pictures, the truck moves quite easily in and out. I didn't try rolling over yet but feels smooth and I think close to the center of grav so should turn over and back no problem.
Now there is space to start the chassis assembly.
Attachments


Moving the truck over on the old one was scary. At least I dont have to worry about it now. (Old one was actually made for a small triumph)
Attachments
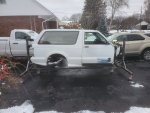
This unit cost me approx $700 (CAN) to build. The wheels were on for 1/2 price at $20 each. Has about $150 worth of nuts/ bolts and $400 for the metal. Ofcouse it was a few weekends of build time but that was the fun part.
I'm sure you can see in the pictures the size difference between the two. The new one is definitely solid.
Glad this part of the build is over. Now onto actual truck work.
Till next time guys.
I'm sure you can see in the pictures the size difference between the two. The new one is definitely solid.
Glad this part of the build is over. Now onto actual truck work.
Till next time guys.
Attachments

Hey All,
Well the truck has been mounted to the new rotisserie for.2 weeks now. Totally rock solid. Glad I built it. I have since added two hydraulic Jacks to the ends to facilitate raising and lowering.
I have also started to reassemble the truck.
Lower arms are in, torsion bars, cross members, Trans mount and rear leaf springs. I'll let.you now how much $ once I get em back
Today I drove home one of my apprentices vans as its empty and he's at school. I've loaded in the front and rear diffs and I'm taking over in the morning for refresh, new seals bearings etc.
Attachments
Hey guys
Well it's been and exciting week for me.
Before I get to pictures of the trucks progress -
Been thinking about a new welder for sometime now and finally just after Christmas, I ordered myself a Millermatic 220 AC/DC MP welder.
what I should have taken 3 or 4 days...well you know the story these days
"Due to Coivd....blah, blah, blah"
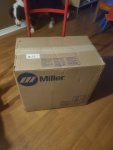
After almost 4 weeks waiting, Finnaly got the call and picked this litte bad boy up yesterday (01/29/21)
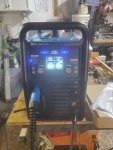
WOW!!! I must say, this thing is awsome!! I am not a pro but I can weld not too shabby and with all the practice I've had recently, I'm only getting better. With the many features this unit has such as pro set, it basically out of the box can make a weekend warrior/novice such as myself have high quality welds with minimal practice.
The main reason for a multi process welder was its ability for Tig/mig/stick all in one package that I can use at work and write off at the same same time though the business.
However the main reasons I purchased this unit are
1. MADE IN THE USA
2. It can TIG weld aluminum (AC tig)
3. I have a Miller Maxstar 150 and has awsome power for.my requirements so I knew this would also
She's pricey at $4500 CAN after tax and ofcouse, had to throw on a $500 lid (and after.using it, I highly recommend) but this setup will help out the restoration of the TY. (And anything else needed welded)
Can't wait to weld in the new floor pans.
Well it's been and exciting week for me.
Before I get to pictures of the trucks progress -
Been thinking about a new welder for sometime now and finally just after Christmas, I ordered myself a Millermatic 220 AC/DC MP welder.
what I should have taken 3 or 4 days...well you know the story these days
"Due to Coivd....blah, blah, blah"
After almost 4 weeks waiting, Finnaly got the call and picked this litte bad boy up yesterday (01/29/21)
WOW!!! I must say, this thing is awsome!! I am not a pro but I can weld not too shabby and with all the practice I've had recently, I'm only getting better. With the many features this unit has such as pro set, it basically out of the box can make a weekend warrior/novice such as myself have high quality welds with minimal practice.
The main reason for a multi process welder was its ability for Tig/mig/stick all in one package that I can use at work and write off at the same same time though the business.
However the main reasons I purchased this unit are
1. MADE IN THE USA
2. It can TIG weld aluminum (AC tig)
3. I have a Miller Maxstar 150 and has awsome power for.my requirements so I knew this would also
She's pricey at $4500 CAN after tax and ofcouse, had to throw on a $500 lid (and after.using it, I highly recommend) but this setup will help out the restoration of the TY. (And anything else needed welded)
Can't wait to weld in the new floor pans.
Attachments
WyoSyclone
Active member
Great work on your resto - that's a lot of nice work you're doing!
Sure wish I could find the inspiration to do some things to my Sy... it doesn't really 'need' anything done to it, as it went through a frame-off in 1998... approximately 1000 miles ago") But I do have some minor upgrades I'd like to finish off. The older I get the harder it gets.
But I do have some minor upgrades I'd like to finish off. The older I get the harder it gets.
Sure wish I could find the inspiration to do some things to my Sy... it doesn't really 'need' anything done to it, as it went through a frame-off in 1998... approximately 1000 miles ago
But I do have some minor upgrades I'd like to finish off. The older I get the harder it gets.Attachments

Got you some mighty nice parts sitting
there. Full restoration at 7 yrs old? Was it in an accident? I know mine has low miles but she sat for 15yrs with full tank of gas, 8 small leaking holes in the roof (sun visor) a ton of mice living in/on and all over it.
My motivation is mainly hanging out with the old man. Him and I have done a few vehicles in the past but haven't had time in a decade or so. Progress is kinda slow cause I only have time on the weekend for few hours. He tinkers away during the week doing minor/easy jobs that give him somthing to do and we get more tech when I come over.
I can't wait to drive this truck again.
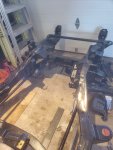
Anyways, got the lower and upper arms, torsion bars, Trans crossmember and mount in, front diff and vent line, and rear springs in. All with the poly bushings. Check out the pics
there. Full restoration at 7 yrs old? Was it in an accident? I know mine has low miles but she sat for 15yrs with full tank of gas, 8 small leaking holes in the roof (sun visor) a ton of mice living in/on and all over it.
My motivation is mainly hanging out with the old man. Him and I have done a few vehicles in the past but haven't had time in a decade or so. Progress is kinda slow cause I only have time on the weekend for few hours. He tinkers away during the week doing minor/easy jobs that give him somthing to do and we get more tech when I come over.
I can't wait to drive this truck again.
Anyways, got the lower and upper arms, torsion bars, Trans crossmember and mount in, front diff and vent line, and rear springs in. All with the poly bushings. Check out the pics
Attachments


WyoSyclone
Active member
Got you some mighty nice parts sitting
there. Full restoration at 7 yrs old? Was it in an accident? I know mine has low miles but she sat for 15yrs with full tank of gas, 8 small leaking holes in the roof (sun visor) a ton of mice living in/on and all over it.
My motivation is mainly hanging out with the old man. Him and I have done a few vehicles in the past but haven't had time in a decade or so. Progress is kinda slow cause I only have time on the weekend for few hours. He tinkers away during the week doing minor/easy jobs that give him somthing to do and we get more tech when I come over.
I can't wait to drive this truck again.
Anyways, got the lower and upper arms, torsion bars, Trans crossmember and mount in, front diff and vent line, and rear springs in. All with the poly bushings. Check out the pics
Yup, apparently original owner Dad let the kid take the Sy to graduation or something and slid it into a pole. A gentleman who owned 23 GM dealerships in the South bought it and told his mechanics to do a frame off, with the order to make it better than new. It received a ton of new parts, as it wasn't very old at the time. It does look and smell brand new, except for one pea-sized ding in the hood. I've mainly just tried to make reliability/modern tech mods to it.
You're doing a great job on your!
Hey Lads,
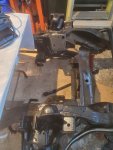
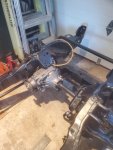
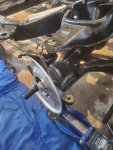
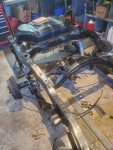
Well, she almost a roller. Got all the chassis bolts torqued down, front and rear diff installed, Ball joints greased, cotter pins in etc.
I ordered stainless steel tube for the brake lines and the tube nuts ofcouse.
I have to fabricate and install brake lines and calpers, need to get front rotors and pads and probably get new e-brake cables. Steering and tie rod ends etc next weekend and maybe my tube and nuts will be here by then.
Slowly she comming together but it's looking real good.
Attachments


Goodgollyjosh
Active member
She's looking good bud! Lovin the updates. Gonna be so smooth on the road with all those fresh ball joints, bushings, etc. A true resto. Be curious to see how much it costs with just parts considering you and your old man are doing all the labor. Keep up the good work.