"Phoon" 1993 TY 0935

NM_TY_Guy

Donating Member
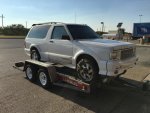
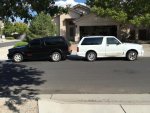
On Sept 28 2015 I picked up 93 TY 0935 (Phoon as my black truck is already called Ty) in Abilene TX, at the time I was told the motor had been rebuilt and just needed finishing up the installation. Yeah so not the case also some cladding was damaged the drivers side rear to kick panels needless to say it needed some work and I figured it would make a good project.

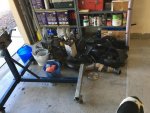
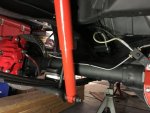
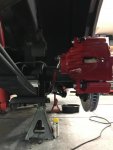
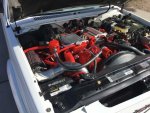
Started off by tearing the "rebuilt" motor down and sent the block to the machine shop of course they measure it and recommended bore it .030 over decking the surface and line boring the the mains and turning the crank 10/10 plus forge pistons. This project got off track from the beginning I only wish I would've put eagle rods in to it at this point but at the time was tying to stick to something of a budget. I built the motor with probe forged pistons stock rods and crank 412 comp cam found some L35 heads with screw in rockers used comp cams self aligning roller tip rockers hardened push rods Alex's springs and retainers.

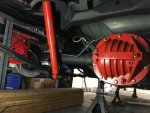
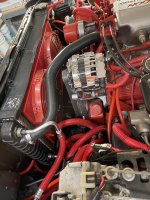
My goal was to keep it close to stock as I plan to drive it on weekends to shows and car runs and the such. I also added ARP head studs and misc Arp hardware fluidampr harmonic balancer powdercoating most parts ceramic coating the exhaust manifolds and crossover pipe. Rebuilt the whole front suspension upper and lower control arm bushings upper and lower ball joint new cv axels Eric Tinns posi front axel. might as well ad a 3k stall converter deeper trans pan and cooler while the motor is out right? Solid motor mounts Jeep steering shaft all the typical upgrades.

Cleaned and repainted the frame etc etc.... I've been slowly working on this thing for almost 2 years and am about to drop the motor in to place and reassemble the front end then change the fuel pump get everything wired/ hooked up order a turbo tweak chip and hopefully get it running by the end of summer if I dont take a 2nd part time job first LOL I will keep adding more pics and listing more parts I've used as I think of them.
 

Attachments

  • image1.jpg
    image1.jpg
    47.8 KB · Views: 14
  • image2.jpg
    image2.jpg
    54.5 KB · Views: 14
  • image3.jpg
    image3.jpg
    55.3 KB · Views: 11
  • image4.jpg
    image4.jpg
    57.2 KB · Views: 12

NM_TY_Guy

Donating Member
Re: "Phoon" 1993 TY 0935

Got the motor back in Phoon transmission bolted up solid motor mount tightened upfront diff installed got the grounds on the rear of the heads bolted down I actually made a few jumper wires to tie all the grounds together hoping to avoid any issues with those!

IMG_0283.jpgIMG_0287.jpg
 
Last edited:

NM_TY_Guy

Donating Member
Re: "Phoon" 1993 TY 0935

Got some work done on the front suspension and brakes as well as all the vacuum lines ran got the ac compressor mounted and the alternator radiator and fan shroud in place as well as the transmission cooler mounter and plumbed ordered a Turbo tweak chip and am hoping to get her running soon ��
IMG_0463.jpg
IMG_0484.jpg
 

NM_TY_Guy

Donating Member
Making some progress I removed the rear leveling system along with the wiring as it was not being used any more and ran my Hot wire kit for the fuel pump in place of that wiring. I cleaned the entire frame and repainted everything. I also removed the rear axel and springs and replaced them with Beltec lowering springs painted the shocks and rear cover to match all the other red. I ran new brake lines to the Camaro rear disc set up. I still need to figure out the parking brakes. I also installed the sportmachine lower dual pass water to air cooler and worked on various little things under the hood.
 

NM_TY_Guy

Donating Member
Been attempting to get this thing to start up the past couple weekends had no fuel pressure at first tracked that to a mis wired fuel pump which was an easy fix that entailed a lot of work then we pushed it out of the garage to attempt to fire it and it had no brakes what so ever but since it was out there already we decided to fire it up and get the timeing set and at least make sure everything else would work and it actually fired up easily we set timing and ran it in a bit allowing it to reach temp found a couple small water leaks so we will address a few more issues before we can put it on the road and do more tuning

5D71B6C8-499E-4049-BD0F-528385F96D89.jpeg
 
Last edited:

NM_TY_Guy

Donating Member
The finished mostly project
 

Attachments

  • B1DDF526-1980-4129-8543-96E7E5A73B58.jpeg
    B1DDF526-1980-4129-8543-96E7E5A73B58.jpeg
    56.7 KB · Views: 11
  • 77C90E8B-835D-4043-80C7-E81D89CEB937.jpeg
    77C90E8B-835D-4043-80C7-E81D89CEB937.jpeg
    57.3 KB · Views: 9
Last edited:

Andreas365

New member
NM_TY_Guy;n1859653 said:
Been attempting to get this thing to start up the past couple weekends had no fuel pressure at first tracked that to a miseries fuel pump which was an easy fix that entailed a lot of work then we pushed it out of the garage to attempt to fire it and it had no brakes what so ever but since it was out there already we decided to fire it up and get the timeing set and at least make sure everything else would work and it actually fired up easily we set timer by and ran it in a bit allowing it to reach temp found a couple small water leaks so we will address a few more issues before we can put it on the road and do more tuning


Nice,, I like this one!
 

Andreas365

New member
NM_TY_Guy;n1859653 said:
Been attempting to get this thing to start up the past couple weekends had no fuel pressure at first tracked that to a miseries fuel pump which was an easy fix that entailed a lot of work then we pushed it out of the garage to attempt to fire it and it had no brakes what so ever but since it was out there already we decided to fire it up and get the timeing set and at least make sure everything else would work and it actually fired up easily we set timer by and ran it in a bit allowing it to reach temp found a couple small water leaks so we will address a few more issues before we can put it on the road and do more tuning


Nice, I like this one!
 

NM_TY_Guy

Donating Member
Been looking in to the water leaks I found when I started this thing up and first thought it was the turbo coolant return where it feeds back in to the block cuz it was dripping off of there. I pulled the line off the fitting end was damaged thought that had to be it and replaced it. It turns out that was not it, so my next thought was the freeze plug behind the motor mount must be leaking knowing that would require pulling the motor again. I wanted to be sure it wasn't anything else (also lost the desire to work on it for a while and got busy with life) so I pulled the exhaust manifold off to get a look at the head and gasket (I really was not looking forward to pulling the motor back out again so soon) and boy am I glad I did because I found 2 head studs leaking right above the freeze plug. A bit of searching and I found out that this is a fairly common issue. To be thorough I am going to check all the head bolts meaning removing both exhaust manifolds and valve covers and remove any leaking ones one at a time and resealing them. The only good part is at least every thing I have to pull apart is nice and clean and new I guess. I thought I had a second leak at the rear center of the motor from the trans inspection cover and thought it might be the rear of the intake so I tore all that apart to be positive it was not an issue finally tracked that back to the same 2 exhaust bolts and the coolant was traveling along the lip of the oil pan and back in to the inspection cover near the starter. I ended up finding a total of 3 leaking ARP head studs 2 external on the pass side head and 1 internal on the drivers side head. I made the decision to remove all the head studs 1 by 1 and reseal them all hopefully preventing any farther issues I hope! I refilled the cooling system and pressure tested it and do not see any leaks now I just have to re-assemble everything.:tup:
 
Last edited:

NM_TY_Guy

Donating Member
WOW its been quite a while since I've been here it has also been a while since I've done much to the Typhoon. I made a decision to do paint and body work on it and proceeded to remove the luggage rack (let me just say I detest body work) and quickly lost interest and I let it just sit in the garage for the most part (also life happens and I got tied up in other things). I decided to clean the garage one day and realized I had parts laying around I needed to install to getting them out of the way permanently. I started with 2 new lower control arms I had purchased due to the old one having stripped sway bar mounting holes. Then I noticed the inter-cooler hoses I had run were kinked and not flowing and needed some attention. While I had the lower cooler off I realized how easy it would be to remove the radiator shroud and add electric cooling fans (I found some red ones to match everything else). While I was wiring in the electric fans I decided to add electric fans on the lower heat ex-changer at the same time. (Note for anyone else doing these fans keep the fan about an inch off from the far left side otherwise it will hit the steering gear box) I ordered weather pack connectors to retain a factory look and make it easier to remove them should I need to in the future. I bought a dual fan set up with an aluminum shroud and powder coated it red to match the red fans. I also had my A/C line repaired (hole welded up) and polished it before re installing it. Paint and body work are still needing to be done but I think I will send it out and let someone else tackle that job. Next I need to get the sway bar back in place so that won't be laying around.
 

Attachments

  • 068E32E0-8C08-4279-B099-F06E8365120E.jpeg
    068E32E0-8C08-4279-B099-F06E8365120E.jpeg
    1.8 MB · Views: 29
  • 278379C4-8AF7-44BC-A736-4D542A358B5F.jpeg
    278379C4-8AF7-44BC-A736-4D542A358B5F.jpeg
    1.2 MB · Views: 27
  • 1F45EFAB-67AF-4FE1-BD41-9C0B21DB5183.jpeg
    1F45EFAB-67AF-4FE1-BD41-9C0B21DB5183.jpeg
    1.8 MB · Views: 24
  • 11AFC31A-571E-47E8-A765-2493A048CC99.jpeg
    11AFC31A-571E-47E8-A765-2493A048CC99.jpeg
    1.7 MB · Views: 25
  • CD958B8E-43BD-4B5D-9DBD-226D4C665DE2.jpeg
    CD958B8E-43BD-4B5D-9DBD-226D4C665DE2.jpeg
    2.9 MB · Views: 24
Last edited:

NM_TY_Guy

Donating Member
Looks good! What brand of fans and shroud did you use? How did you wire in those electric fans?
The fans shroud and controller I got from FFDynamics.com I had to powder coat the shroud red myself. I did not like their sensor so I ordered one from painless wiring. I installed it in the passenger side head. I also didn’t like the idea of using the plastic ties that push thru the radiator so I made some simple small L brackets and pop riveted them to the shroud then fastened them to the top rail and bottom rails on the radiator. I took power from the power point on the fire wall and used the switched power from the intercooler pump relay. It also connects to the ac wiring to run the fans when the ac is on I grabbed that from the relay next to the fan controller. Their controller is pictured to the far left above the brake booster the relay on the far right runs the lower intercooler fans.
 

Attachments

  • 90A1DA25-09C9-4CD4-8B26-EE2CFCFD1580.jpeg
    90A1DA25-09C9-4CD4-8B26-EE2CFCFD1580.jpeg
    1.4 MB · Views: 10
Top